Advanced Cash Management
Various methods can be used to create accounting entries. You have already seen how an invoice creates its own entries, for example.
In this section we will explain how you can manage other accounting entries, such as:
- bank statements,
- cash,
- manual journal entries.
In this chapter we will show you how to enter financial transactions. In OpenERP, you can handle bank statements and you can keep a cash register. Use different journals for these two kinds of transaction, i.e. a journal of the Bank and Cheques type for bank statements, and a journal of the Cash type if you keep a cash register. According to the journal type selected, you will have a different screen. For more information about creating journals, refer to the Configuring Accounts from A to Z chapter.
Managing Bank Statements
OpenERP provides a visual tool for managing bank statements that simplifies data entry into accounts. As soon as a statement is validated, the corresponding accounting entries are automatically generated by OpenERP. Also non-accounting people can enter financial transactions without having to worry about things such as credit, debit and counterparts. In a bank statement, you can enter positive amounts if you gain money with a transaction and negative amounts if you pay money from your account.
To enter a bank statement, go to the menu Accounting ‣ Bank and Cash ‣ Bank Statements. Click Create to open a data entry form for bank statements, as shown in figure Registering a Bank Statement.
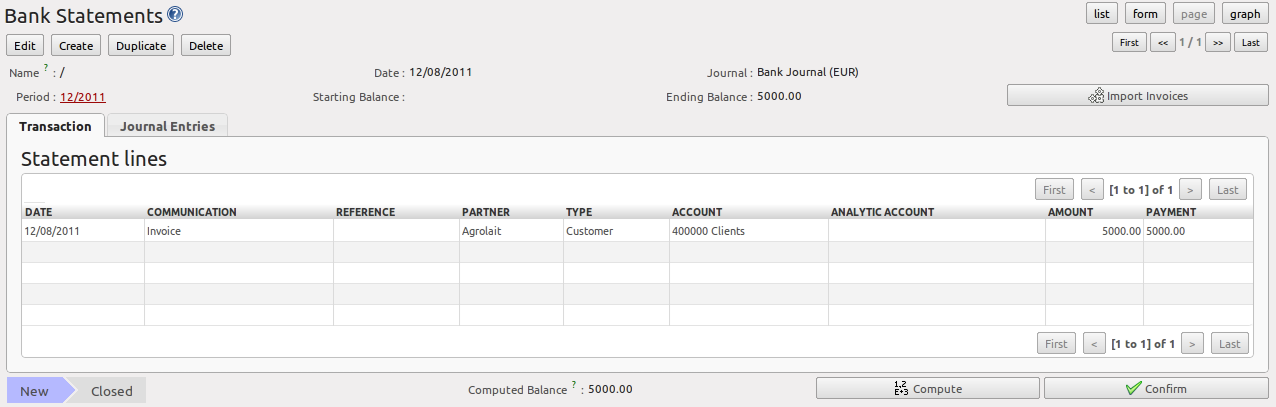
Registering a Bank Statement
The statement reference Name and the Date are automatically suggested by OpenERP. The Name will be filled with the statement number at confirmation of the bank statement. You can configure your own reference by managing sequences in the Settings ‣ Configuration ‣ Sequences & Identifiers menu.
Then select the correct Journal. Ideally, when you are configuring your company, you would create at least one journal for each bank account and one journal for petty cash in your company. So select the journal corresponding to the bank account whose statement you are handling.
The currency you are using for the statement line is that of the selected journal. If you are entering statement lines for an account in US Dollars (USD), the amounts have to be entered in USD . The currency is automatically converted into the company’s main currency when you confirm the entry, using the rates in effect at the date of entry. (This means that you would need valid currency conversion rates to be created first. Go to Accounting ‣ Configuration ‣ Miscellaneous ‣ Currencies menu.)
OpenERP automatically completes the initial balance based on the closing balance of the preceding statement. You can modify this value and force another value. This lets you enter statements in the order of your choice. Also if you have lost a page of your statement, you can enter the following ones immediately and you are not forced to wait for a duplicate from the bank.
Enter the closing balance which corresponds to the new value in the account displayed on your bank statement. This amount will be used to control the operations before approving the statement.
Then you have to enter all the lines in the statement. Each line corresponds to a banking transaction indicated on your paper statement.
Enter the transaction line. You have two ways of entering financial transactions: manually or through the Import Invoices button.
Manual Entry
Remember that blue fields are mandatiry fields and require a value to be filled. When you type the Partner name, OpenERP automatically proposes the corresponding centralisation account. Check whether the proposed payment type is correct. Customer will be used to register customer payments, while Supplier will be used for supplier payments. General can be used to enter banking costs, for instance.
You should then enter the amount that appears on your statement line: add a negative sign for a withdrawal (for instance, a supplier payment) and a positive sign for a cash payment or deposit.
In the Payment select Create and Edit to reconcile your payment directly with the corresponding accounting entry or entries to be paid.
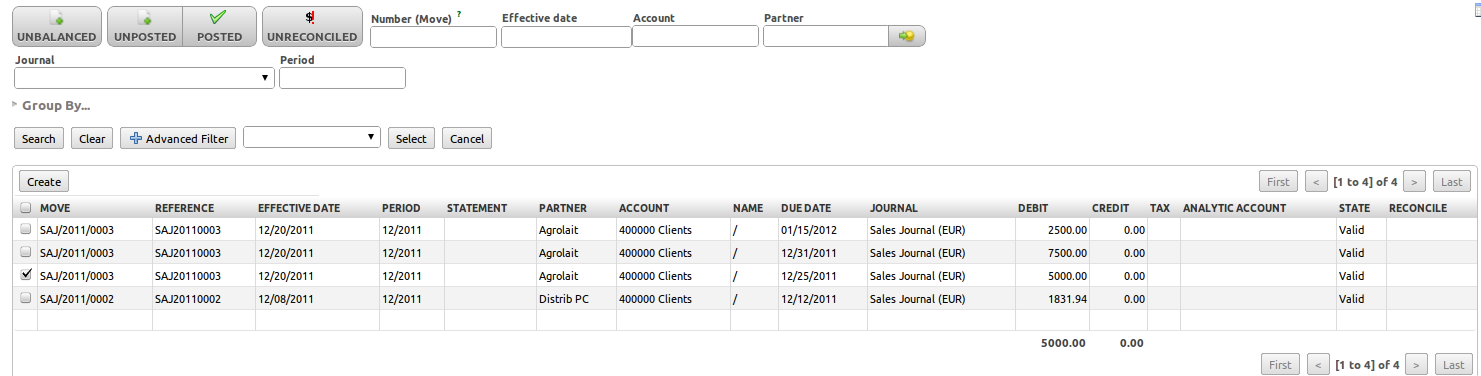
Import Invoices
Click the Import Invoices button, then click Add to get a list of invoices for which your payment will have to be reconciled. Tick the checkbox in front of each invoice you need and click Select. Click OK to confirm your selection; the statement line will automatically be added with the corresponding reconciliation.
Reconciliation from the Bank Statement
Note
Reconciliation
Other methods of reconciliation are possible: from manual accounting entries, when saving the payment directly on an invoice, through Customer Payment or Supplier Payment or using the automatic reconciliation tool.
You can carry out either a full or a partial reconciliation.
If there is a difference between the payment and the invoices to reconcile, you can enter the difference in the second part of the form Write-off. You have to set an account for the adjustment. The main reasons explaining the difference are usually:
- profit or loss,
- exchange differences,
- discounts given for fast payment.
When the reconciliation is complete - that is, the payment is equal to the sum of the due payments and the adjustments - you can close the reconciliation form.
The reconciliation operation is optional – you could very well do it later or not do it at all. However, reconciliation has got two significant effects:
- marking that the invoices have been paid,
- preventing the payment and invoice amounts from appearing on customer reminder letters. Unless you have reconciled them, a customer will see the invoice and payment amounts on his reminder letter (which will not alter the balance due since they will just cancel each other out).
Finally, once you have entered the complete bank statement, you can validate it. OpenERP then automatically generates the corresponding accounting entries if the calculated balance equals the final balance, indicated in the Ending Balance field. The reconciled invoices are marked as paid at that point.
You can also enter general accounting entries, for example, banking costs. In such cases, you can enter the amounts directly in the corresponding general accounts with the General type selected.
A user with advanced accounting skills can enter accounting entries directly into the bank journal from Accounting ‣ Journal Entries -> Journal Items. The result is the same, but the operation is more complex because you have to know the accounts to use and master the ideas of credit and debit.
Cash Register Management
To manage your cash register, you can use the menu Accounting ‣ Bank and Cash ‣ Cash Registers. At the start of the day you set the opening amount of cash in the entry (Opening Balance). Then open the cashbox to start making entries from the Cash Transactions tab. Enter, for instance, -20 because you bought stamps from the cashbox.
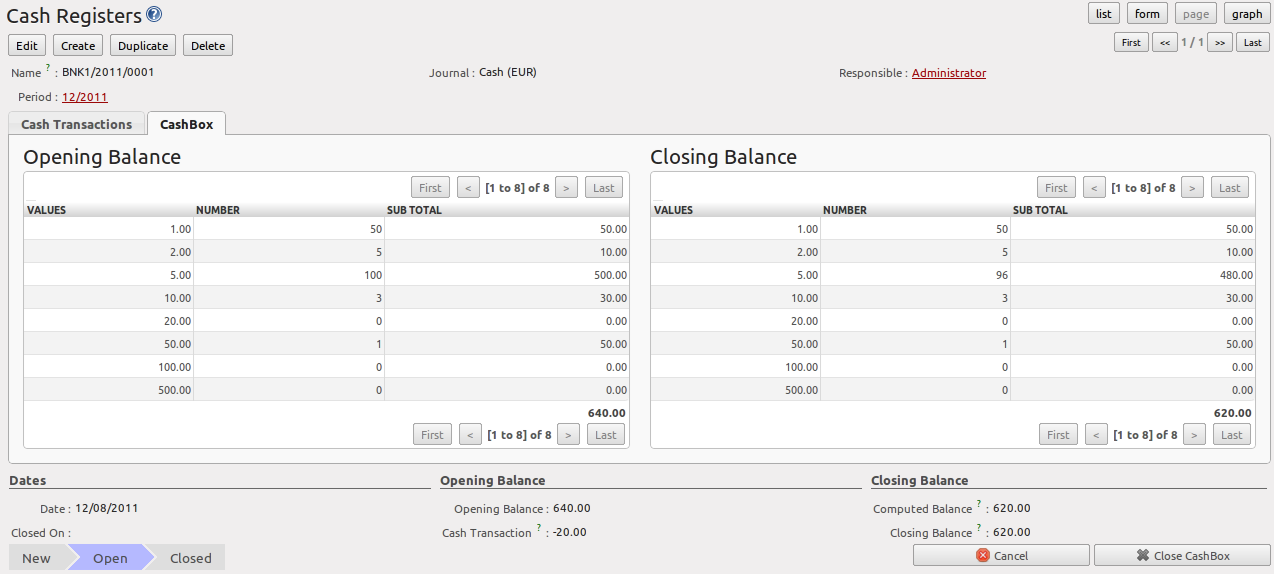
Cash Register
All the transactions throughout the day can then be entered in this statement. When you close the cashbox, generally at the end of the day, enter the amounts on the CashBox tab, in the Closing Balance section. Then confirm the statement to close the day’s cash statement and automatically generate the corresponding accounting entries. Note that the Computed Balance and the Closing Balance need to be equal before you can close the cashbox.
Tip
Confirming the Statement
Accounting entries are only generated when the cash statement is confirmed. So if the total statement has not been approved (that is to say during the day, in the case of petty cash), partner payments will not have been deducted from their corresponding account.
Miscellaneous Operations
Invoices and statements produce accounting entries in different journals. But you could also create entries directly in a journal (line by line) without using the dedicated journal views. This functionality is often used for miscellaneous entries.
To make manual entries, go to the following menu Accounting ‣ Journal Entries ‣ Journal Items. In the Journal field from the filter, start typing the journal in which you want to post (OpenERP will autocomplete), as well as the period, then click Search. When you select a journal and a period in this filter, you do not have to fill in the journal on each line when posting new entries. Click Create to register a miscellaneous entry. Make sure to complete all blue (mandatory) fields. According to the journal settings, counterpart accounts will be proposed automatically.
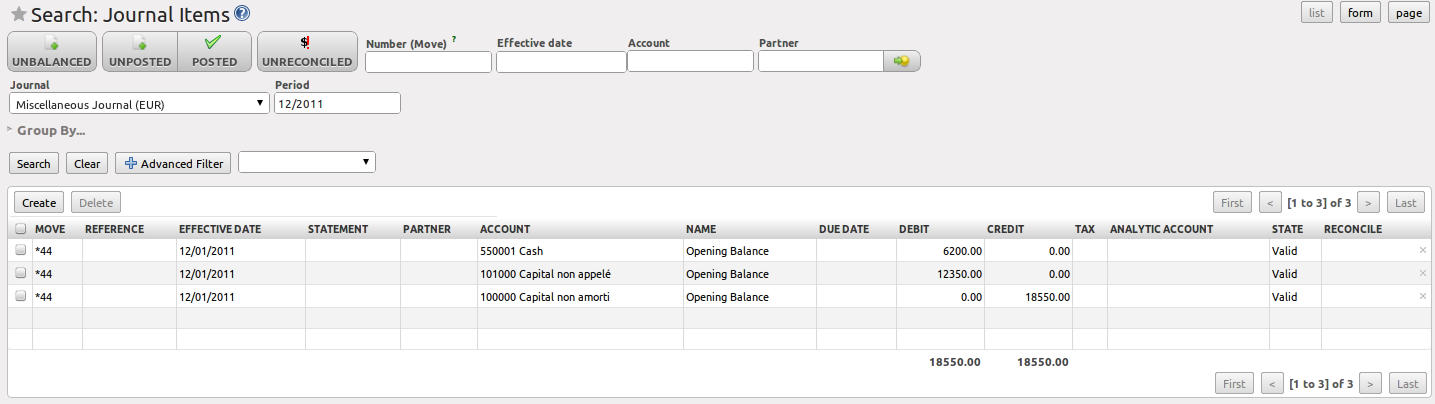
Miscellaneous Entry through Journal Items
You can also post miscellaneous entries from the menu Accounting ‣ Journal Entries ‣ Journal Entries. Click Create and select the journal in which you want to post your miscellaneous entry. In the Journal Items block, click Create to start entering lines. Enter the required fields, such as Name and Account, Debit or Credit. Press the Enter key to confirm your line; the counterpart entry will automatically be proposed. Change it as required or add extra lines to complete your entry.
Click the Post button to validate your entry.