Recording Journal Items
All the accounting transactions in OpenERP are based on records, whether they are created by an invoice or directly.
Financial statements such as the general ledger, account balance, aged balance (or chronological balance) and the various journals are all based on accounting entries. It does not matter if you generated the entry from an invoice form or directly in the invoice journal. It is the same for the tax declaration and other statutory financial statements.
Recording Sales Entries through Journal Items
Journal entries can be entered in several ways, either manually or automatically. As discussed in previous chapters, journal entries are generated automatically on confirmation of purchase and sales invoices, for instance. Manual entries can be added through Journal Entries (several entries in one journal) or through Journal Items (line by line, for accountants).
To easily record journal items, configure your sales journal with a default debit and credit income account, which will be proposed automatically. You also need to add a default sales tax to these accounts, which can be done from the menu Accounting ‣ Configuration ‣ Financial Management ‣ Accounts ‣ Accounts. Open the income account you added as default debit and credit account. Click the Add button in the Default Taxes block and select the applicable local tax(es).
Let us give the example of manually entering a sales invoice through Accounting ‣ Journal Entries ‣ Journal Items. Note however that these entries are usually generated automatically by OpenERP.
Select the journal in which you want to post entries in the Journal box, enter the period and click Search. Now click the Create button.

Receivable Entry (first line)
Start by entering the receivable entry (Account Receivable or Customer account). Fill at least the following fields in the following order:
- Partner: partner concerned,
- Name: description of the invoice line (e.g. PC2 ),
- Debit or Credit: here you type the debit or credit amount (for sales typically the credit amount). Type the amount inclusive of taxes.
Press the Enter key on your keyboard to validate the first line. The next draft move number is assigned to your accounting entry. Your line is then colored red and takes the Unbalanced state. When a line is in the draft state, it is not yet reflected in the accounts. OpenERP will not validate that line until the balancing entry is made (so the credit amounts should balance the debit amounts for that set of entries).
OpenERP now automatically proposes the balancing accounting line with the default account from the sales journal and default tax linked to this account.

Automatically proposed Sales Entry (second line)

Automatically proposed Sales Entry (third line for VAT)
At this stage you can modify and validate this second line of the account. When you press the Enter key on your keyboard to validate the second line, the corresponding tax line will automatically be proposed. Your entry now has status Valid. This status indicates that your entry is balanced, but it can still be reviewed.
To actually post this entry, select the lines concerned by checking the corresponding checkboxes and click Post Journal Entries at the right side of the screen.
Note
Posting Entries
You can also post your entries from the menu Accounting ‣ Journal Entries ‣ Journal Entries. Simply select the green button at the end of a journal entry line. This has the same effect as the Post Journal Entries wizard.
Tip
Completing a Balancing Entry
If you want to add some other balancing lines you can enter the number of the entry on the new line that you are entering. In such a case the whole line stays Draft until the whole set balances to zero.
Miscellaneous Operations: Creating an Opening Entry
When you use OpenERP Accounting & Financial Management for the first time, you will have to enter your Opening Balance for your balance sheet accounts. You can do this through a miscellaneous entry. The best thing is to create a specific Opening Journal (see also the Configuring Accounts from A to Z chapter for more details) and an Opening Period.
Then, each balance sheet account that has a balance in your previous accounting system has to be reopened with the exact same balance. To do this, go to Accounting ‣ Journal Entries ‣ Journal Entries, click Create and select the Opening Journal and Period. For each account, create a new line and enter the balance (either debit or credit). The counterpart account for such an entry will typically be your Profit & Loss Account (defined in your journal settings).
Once you started to keep your books in OpenERP, opening entries can be generated automatically at the annual closing (see also the Configuring Accounts from A to Z chapter).
Journal Entries
To get an overview of existing journal entries or to create new journal entries, go to Accounting ‣ Journal Entries ‣ Journal Entries. Journal entries can be generated in two ways: automatically from invoices or manually by entering account lines in a journal.
You can indeed create the accounting records directly, without using the invoice and account statements. Some accountants prefer this approach because they might find it easier to think in terms of accounting records rather than in terms of invoices and payments.
You should really try to use the forms designed for invoices and bank statements rather than manual data entry records, however. These are simpler and are managed within an error-controlling system.
Through this view, you can see each and every entry that has been made in your accounting system, grouped by move number (each journal entry gets an automatic number). If you want to have a look at each individual move line, you should go to Accounting ‣ Journal Entries ‣ Journal Items.
From the State column, you can check whether the journal entry has already been validated (Posted) or not (Unposted).
If you want to have a certain journal entry reviewed by someone else (e.g. your accountant if you prepare most of the entries yourself), you can check the To Review box. In List view, the To Review button allows you to easily look up entries that need a second opinion.
This screen can also be used to group entries, for instance by partner, journal, or period. The order in which you click the Group by buttons determines the way your data will be displayed. With the Advanced Filters, you can look up entries according to amount (is equal to, smaller than, greater than, ...). You can also indicate whether Any, All or None of the conditions should match. These extended filters allow you to get a great view on all your accounting entries!
Manual Reconciliation Process
Note
Reconciliation
Reconciliation links entries in an account that cancel each other out – they are reconciled to each other (sum of credits = sum of debits).
This is generally applied to payments or credit notes against corresponding invoices.
Without the reconciliation process, OpenERP would be incapable of marking invoices that have been paid. Suppose that you have got the following situation for the Agrolait customer:
- Invoice 145: 50,
- Invoice 167: 120,
- Invoice 184: 70.
If you receive a payment of 120, OpenERP will delay reconciliation because there is a choice of invoices to pay. It could either reconcile the payment against invoices 145 and 184 or against invoice 167.
Tip
Treatment in Lots
Usually, different transactions are grouped together and handled at the same time rather than invoice by invoice. This is called batch work or lot handling.
You can select several documents in the list of invoices: select the checkboxes of the required lines using the web client and click the appropriate shortcut button at the right; or shift-click the lines using the mouse in the GTK client and use the action or print button at the top – these give you a number of possible actions on the selected objects.
This reconciliation transaction can be carried out at various places in the process, depending on your preferences:
- at data entry for the accounting statement,
- manually from the account records,
- automatically using OpenERP’s intelligent reconciliation.
The reconciliation operation consists of matching entries in different accounts to indicate that they are related. Generally reconciliation is used for:
- matching invoice entries to payments, so that invoices are marked as paid and customers do not get payment reminder letters for those entries (reconciliation in a customer account),
- matching deposits and cheque withdrawals with their respective payments,
- matching invoices and credit notes to cancel them out.
A reconciliation has to be carried out on a list of accounting entries by an accountant, so that the sum of credits equals the sum of the debits for the matched entries.
Reconciliation in OpenERP can only be carried out in accounts that have been configured as reconcilable (the Reconcile field in the Account definition).
For manual reconciliation, open the entries for reconciling an account through the menu Accounting ‣ Periodical Processing ‣ Reconciliation ‣ Manual Reconciliation.
You can also call up manual reconciliation from the Journal Items screen.
Before starting to reconcile entries, print a partner ledger to have a good view on related entries.
Select the account and/or partner for which entries need to be reconciled.
Tip
Sorting Entries to be Reconciled
If you only select an account (e.g. account receivable) to be reconciled, you can easily click the Partner column to sort the entries by partner. Note that in OpenERP you can click any column heading to sort your data differently. Click once to sort in ascending order and twice to sort in descending order.
OpenERP indicates the sum of debits and credits for the selected entries. When these are equal you can click the Reconcile Entries action (at the right side of the screen; when hidden, click the small arrows) to reconcile the entries.
Note
Example Real Case of Using Reconciliation
Suppose that you are entering customer order details. You wonder what is outstanding on the customer account (that is the list of unpaid invoices and unreconciled payments). To review it from the order form, navigate to the Partner field, click the button with the hand and select the option Receivables and Payables. OpenERP opens a history of unreconciled accounting entries on screen.
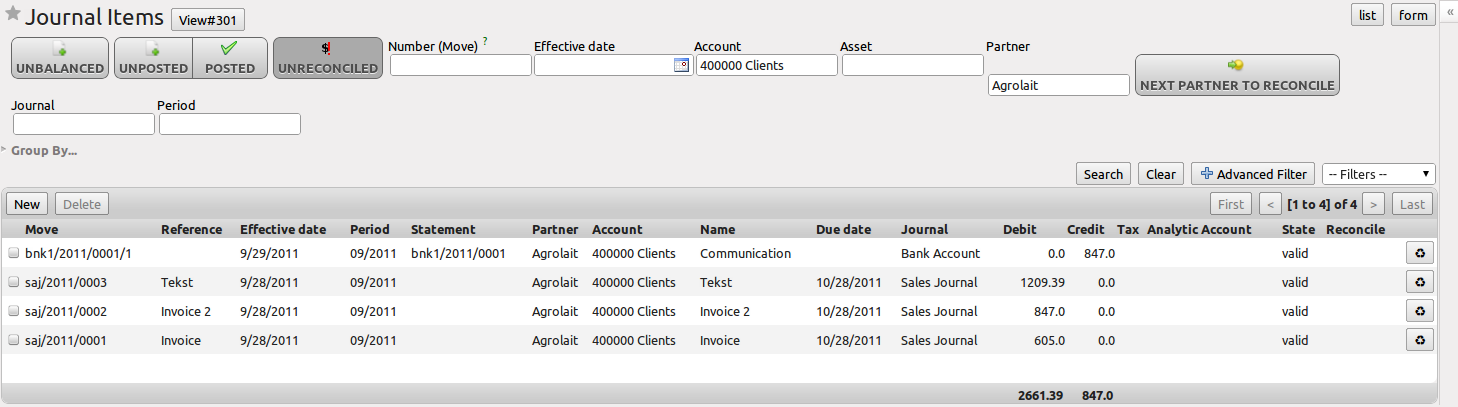
Unreconciled Accounting Entries
After running the Reconcile Entries wizard, these lines can no longer be selected and will not appear when the entries are listed again. If there is a difference between the two entries, OpenERP suggests you to make an adjustment. This “write-off” is a compensating entry that enables a complete reconciliation. You should therefore specify the journal and the account to be used for the write-off.
For example, if you want to reconcile the following entries:
| Date | Ref. | Description | Account | Debit | Credit |
|---|---|---|---|---|---|
| 12 May 11 | INV23 | Car hire | 4010 | 544.50 | |
| 25 May 11 | INV44 | Car insurance | 4010 | 100.00 | |
| 31 May 11 | PAY01 | Invoices n° 23, 44 | 4010 | 644.00 |
On reconciliation, OpenERP shows a difference of 0.50. At this stage you have two possibilities:
- do not reconcile, and the customer receives a request for 0.50,
- reconcile and accept an adjustment of 0.50 that you will take from the P&L account.
OpenERP generates the following entry automatically:
| Date | Ref. | Description | Account | Debit | Credit |
|---|---|---|---|---|---|
| Date | Ref. | Description | Account | Debit | Credit |
| 03 Jun 11 | AJ001 | Adjustment: profits and losses | 4010 | 0.50 | |
| 03 Jun 11 | AJ001 | Adjustment: profits and losses | XXX | 0.50 |
The two invoices and the payment will be reconciled in the first adjustment line. The two invoices will then automatically be marked as paid.
Productivity Tips
Tip
Creating new Data
To quickly create new information, such as a partner, an account or a product, you can use the small button with the hand. When you click this button, select the Create option. Inside a field, instead of simply selecting existing information, you can also select the Create and Edit option to create new accounts or partners, for instance.
Tip
Related Information
To quickly find related information, for instance for a partner, an account or a product, you can use the small button with the hand. When you click this button, some options related to the object will be displayed, of course taking into account the Business Applications installed.
Tip
Duplicating a Document
The duplication function can be applied to all the system documents: you can duplicate anything – a product, an order, an invoice, or a delivery.
Note
Duplicating Invoices
Instead of entering a new invoice each time, you can base an invoice on a similar preceding one and duplicate it. To do this, first search for a suitable existing invoice. Open the selected invoice, then click Duplicate. In the GTK client, select Form ‣ Duplicate from the top menu.
The duplication creates a new invoice in the Draft state. That enables you to modify the invoice before approving it. Duplicating documents in OpenERP is an intelligent function, which enables the duplicated invoice to be given its own sequence number, today’s date, and the draft state, even if the preceding invoice has been paid.
Note
Getting Information by Navigating to it
As you are creating an invoice you will often find you need extra information about the partner to help you complete the invoice. As described earlier, you can navigate to other information linked to this partner by clicking the small button with the hand, such as:
- Monthly Turnover
- Benefit Details,
- Most Recent Invoices,
- Receivables & Payables,
- Contracts / Analytic Accounts,
- Latest Orders - Sales Order, Purchase Order.
Please note that the displayed options depend on the number of Business Applications you have installed. Do the same to get information about the products you are invoicing. For example: is there enough stock? When will you be getting more stocks in? What are the costs and normal list prices for this product?
By making this information easily accessible while you are invoicing, OpenERP greatly simplifies your work in creating the invoice.
Note
Find what You Need from a Journal Entry
When you are encoding journal entries, you will see the button with the small hand which allows you to drill down to related information for the field concerned. Below you will see an example of information that can be looked up for a journal, such as Unpaid Invoices and Bank Statements. The drill-down button can be found on many fields, such as account, product, partner, journal, analytic accounts, and more. This button also provides a quick way to check any unreconciled entries for an account.
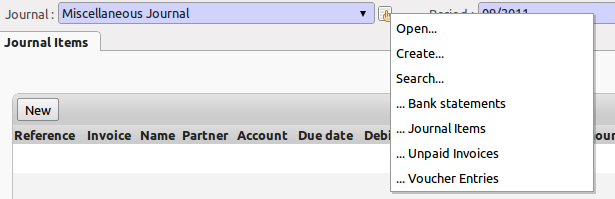
Clicking the Drill-Down Button for Extra Information