Advanced Invoice Management
The principle of entering data for invoices in OpenERP is very simple, both for people with no background in accounting (see chapter :ref:custinv`) and accountants. This means that your accounting information can be kept up-to-date all the time as orders are placed and received, and their taxes are calculated.
People who have more accounting knowledge will be able to keep full control over the accounting entries that are being generated. Each value proposed by OpenERP can be modified later if needed.
In OpenERP, the concept of “invoice” refers to the following documents:
- The Customer Invoice,
- The Supplier Invoice,
- A Customer Credit Note (also called Customer Refund),
- A Supplier Credit Note (also called Supplier Refund).
Only the invoice type and the representation mode are different, but still very similar, for each of the four documents. But they are all stored in the same object type in the system.
Each of the four invoice types is related to a corresponding menu item. This allows you to easily distinguish between them, and also to directly refer to the invoice type you need to work on.
Note
Credit Note
A credit note is a document that enables you to refund an invoice or part of an invoice.
Creating a Customer Invoice
To access customer invoices in OpenERP, use the menu Accounting ‣ Customers ‣ Customer Invoices; for supplier invoices, go to the menu Accounting ‣ Suppliers ‣ Supplier Invoices.
In general, when you also use OpenERP’s functionality for sales, purchases and logistics, most of the invoices do not need to be entered manually as they are linked to other processes in the system. Draft invoices are generated automatically by OpenERP from other documents such as Sales Orders, Purchase Orders or Shipments.
OpenERP uses the following ways to generate invoices:
- from purchase or sales orders,
- from receipt or dispatch of goods,
- from work carried out (timesheets),
- from closed tasks (projects),
- from fee charges or other rechargeable expenses (service management).
The chart Accounting Workflow for Invoicing and Payment shows the financial workflow followed by each invoice.
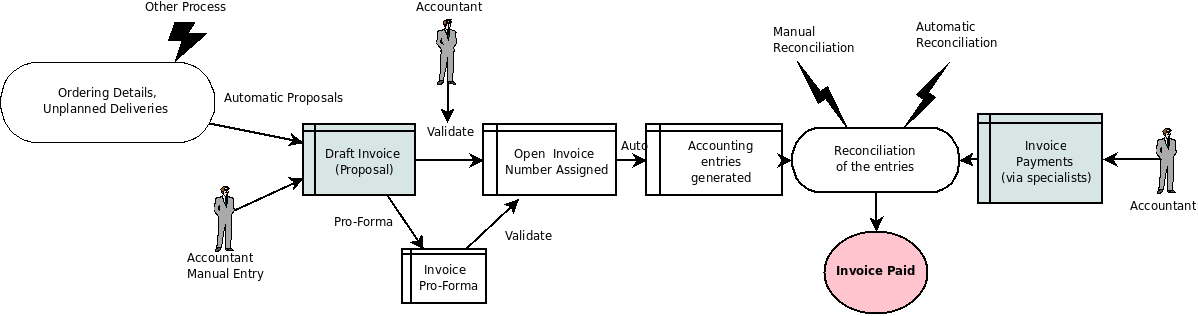
Accounting Workflow for Invoicing and Payment
The integrated software generates invoice proposals (also called Draft Invoices) which are initially set to the ``Draft`` state, which means they can easily be changed when required. As long as these invoices remain unconfirmed, they have no accounting impact on the system.
Draft sales invoices have to be approved by an accountant or other dedicated users and sent to the customer. The different invoicing methods are detailed in the following sections and chapters.
You can also create invoices manually, both for customers and suppliers. This option is usually used for invoices that are not associated with an order (e.g. purchase invoices for electricity) or credit notes.
Of course, you might need to edit or add extra information to the invoice before sending it to the customer. For example, when setting the tax parameters for partners, you have not realised that the customer is tax-exempt. The invoice generated from an order will contain tax at the normal rates based on system settings for partner, product or account. You can then easily edit the invoice before validating it.
You can create or edit a draft customer invoice manually from the menu Accounting ‣ Customers ‣ Customer Invoices.
The information that is needed for invoicing is automatically taken from the Partner form (such as payment conditions and the invoice address) or from the Product (such as the account to be used) or from a combination of the two (such as applicable Taxes and the Price of the product). From an invoice, you can easily create a new partner, a new product, a new account without having to leave the invoice screen. You can also edit existing data, all from within one form. This makes it very easy to quickly enter invoices.
Tip
Draft Invoices
There are several advantages in working with draft invoices:
- You have got an intermediate validation state before the invoice is approved. This is useful when your accountants are not the people creating the initial invoice, but are still required to approve it before the invoice is entered into the accounts.
- It enables you to create invoices in advance, without approving them at the same time. You are also able to list all of the invoices awaiting approval.
You can approve (or validate) an invoice to change its status to ``Open``. Clicking the Pro-forma button will set the invoice to the ``Pro-forma``status. A pro forma invoice does not have an invoice number yet, nor any accounting entries, and is commonly used as a preliminary invoice or for customs purposes. Such a pro forma invoice is more formal than a draft invoice and can easily be converted to an open invoice when required, simply by clicking the Validate button.
An open invoice has a unique invoice number. The invoice is sent to the customer and is marked in the system as awaiting payment.
Start by manually entering a customer invoice. Go to Accounting ‣ Customers ‣ Customer Invoices and click the Create button.
A new invoice form opens allowing you to enter information.
Entering a New Invoice
The document is composed of three parts:
- the top of the invoice, with customer information,
- the main body of the invoice, with detailed invoice lines,
- the bottom of the page, with details about taxes and totals and the status of the invoice.
To enter a document in OpenERP, you should try to always fill in the fields in the order they appear on the screen. Doing it this way means that some of the later fields are filled in automatically from the selections made in earlier fields.
The Sales Journal is proposed by default. If you use several sales journals, make sure to select the required journal. Then select the Customer, and the following fields will be completed automatically:
- the invoice address: corresponds to the customer contact associated to the Invoice address type in the partner form (or otherwise the Default address type),
- the account: corresponds to the centralisation account specified in the Accounting tab of the Partner form,
- a specific or a default payment term: can be defined for the partner in the Accounting tab of the Partner form. Payment conditions are generated by rules for the payment of the invoice. For example: 50% in 21 days and 50% in 60 days from the end of the month.
You do not have to enter a date and a period, because the system’s date and corresponding period will be set automatically on validation. For purchase invoices, set the date specified on the supplier’s invoice. The period will be proposed accordingly on validation.
Note
Properties Fields
The Properties fields (fields with default values, such as payment term) on the Partner or the Product form are multi-company fields. The value the user sees in these fields depends on the company he works for.
If you work in a multi-company environment that is using one database, you have several charts of accounts. Centralisation accounts for a partner depend on the company the user works for.
Tip
Seeing Partner Relationships
You can reach more information from certain relation fields in OpenERP.
- In the web client, a relation is commonly a hyperlink that you open by clicking the small button with the hand, next to a field - it takes you to the main form for that entity, with all of the actions and links.
According to the Business Applications you use, one way or another you can rapidly reach the partner’s:
- current sales and purchases,
- CRM meetings,
- invoices,
- accounting entries,
- payable and receivable accounts.
You can add more detailed additional information to the invoice and select the currency that you want to invoice in.
For each invoice, you have to enter the different invoice lines. You could use either of the two techniques:
- use a product to complete the different fields automatically;
- use no product, but instead enter all blue (= mandatory) fields manually for one-off sales,
Tip
Invoice Line Description
The invoice line description is more of a title than a comment. If you want to add more detailed comments you can use the Notes field.
Select the product Basic PC in the product field of an invoice line. You can enter a product code, or part of the name of a product. OpenERP will propose corresponding products. The following fields are then completed automatically:
- Description: this comes from the product, in the language of the partner,
- the Quantity is set to 1 by default, but can be changed manually,
- Unit of Measure, e.g. PCE, defined by default in the Product form,
- Unit Price: this is the sales price in the Product form or the price from the selected pricelist; the unit price is expressed exclusive of taxes,
- Account: the sales account defined in the product properties. If no account is specified in the Product form, OpenERP uses the properties of the category the product is associated with.
- Taxes: provided by the Product form and related to the fiscal position (either from the Partner form or added manually to the invoice).
You can add more lines by clicking the Save & New button. When you are done entering invoice lines, click the Save & Close button.
Tip
Managing the Price with Tax Included
By default, OpenERP invoices and processes the price without taxes – they are managed as a separate amount. OpenERP can manage tax-inclusive prices when you check the Tax Included in Price field when configuring the tax.
Note
Information about the Product
When you are entering invoice data, it can sometimes be useful to get hold of more information about the product you are invoicing. Note that the options depend on the number of Business Applications installed. Simply click the small button with the hand to select the available reports. OpenERP provides three standard reports about the product:
- forecasts of future stock,
- product cost structure,
- location of the product in your warehouses.
You can enter several invoice lines and modify the default values that are automatically completed by OpenERP. Do not forget to change the default quantity of 1 to the correct quantity.
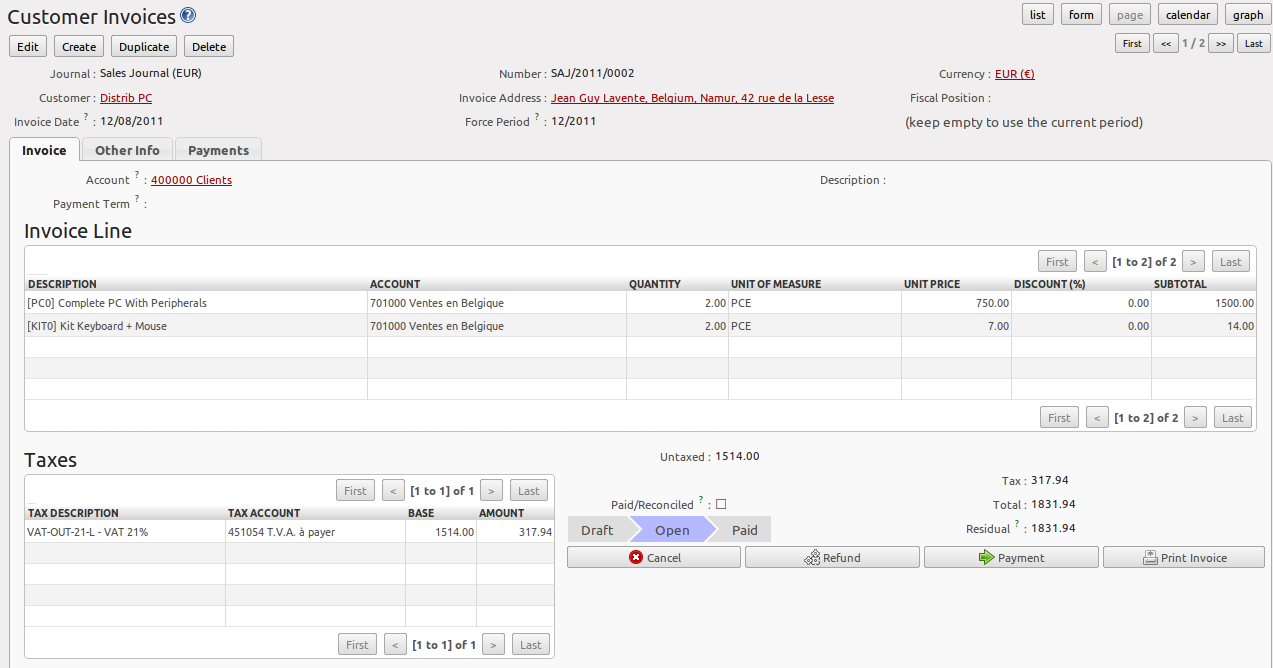
Once the invoice lines have been entered, you can click Compute Taxes on the invoice to get the following information:
- details of tax calculated,
- tax rate,
- total taxes,
- total price.
In the Taxes area at the bottom left of the invoice you will find the details of the totals calculated for different tax rates used in the invoice.
Tip
Tax Calculations
When the invoice is not in Edit mode, you can click one of the lines in the tax summary area in the invoice.
OpenERP then shows you the detail of the tax charges which will be used to compute your tax declaration at the end of the period.
It shows you the total that will be computed in the different parts of the legal declaration. This enables you to manage the declaration in OpenERP automatically.
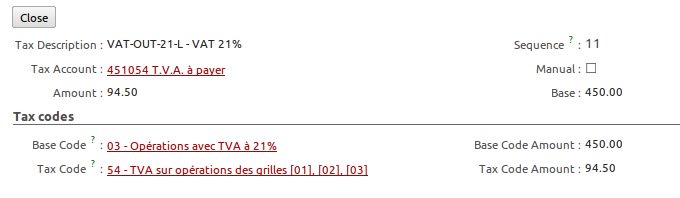
Detail of Tax Charges on an Invoice
On the second tab Other Info, you can change the due date of the invoice (automatically proposed according to the payment terms). You can also select a salesman, if it has not been set by default for the customer. A proposed salesman can also be changed for the invoice.
Before approving the invoice you can modify the date and the accounting period, which will be set by default to today’s date on confirmation of the invoice.
Note
Invoice Layout
If you want to make your invoice layout more elaborate you can install the module account_invoice_layout. This enables you to add various elements between the lines such as subtotals, sections, separators and notes.
Click Validate when you want to approve the invoice. It moves from the Draft state to the Open status. You can easily see the current status of the invoice through the coloured status fields (blue for draft, grey for open) at the bottom of the screen.
When you have validated an invoice, OpenERP attributes a unique number from a defined sequence (see Number field). By default, it takes the form Journal Code/Year/Sequence Number for example, saj/2011/005 . You cannot modify an invoice number. Instead, to get a number that corresponds to your needs, you should modify the sequence numbers through the menu Settings ‣ Configuration ‣ Sequences & Identifiers ‣ Sequences.
Accounting entries corresponding to this invoice are automatically generated when you approve the invoice. Have a look at the details by clicking the small button with the hand next to the Journal Entry field on the Other Info tab (when the invoice is in Edit mode). When the invoice is not in Edit mode, simply click the entry number next to the Journal Entry field. Here you can see the account moves generated by that invoice number.
The Print Invoice button allows you to print the validated invoice. Automatically, the invoice will be stored as an attachment. When the edi module is configured (read more about it in this book), the invoice will be emailed to the customer on validation.
Tip
Occasional Invoices
When you create an invoice for a product that will only be sold once, you do not have to encode a new product. Instead, you will have to provide quite a bit of information manually in the invoice line, especially the blue or mandatory fields:
- sales price,
- applicable taxes,
- account,
- product description.
Tax Management
Taxes can be defined from the Accounting ‣ Configuration ‣ Financial Accounting ‣ Taxes ‣ Taxes menu. OpenERP not only allows you to define general sales and purchase taxes, but also specific taxes, such as ecological taxes, that should be added to a product together with the default tax.
You can combine as many taxes as required for an invoice line. For further details about tax definition, please refer to the chapter Managing your Tax Structure.
Default taxes can be added to a product or to a general account (mostly for purchase invoices). One of the main options to determine the applicable taxes for an invoice line, are the taxes defined in the Product form. By default, OpenERP takes account of all the taxes defined in the product form. This means you can easily add several legal taxes to one product, such as the Belgian Recupel (collection of waste electronic and electric material) and Bebat (battery) taxes.
Take the case of the following product:
Applicable taxes:
- VAT: 19.6% type VAT
- DEEE: 5.5, type DEEE
Note
DEEE Tax
The DEEE tax (disposal of electronic and electrical equipment) is an ecological tax that was imposed in France from 2009. It is applied to batteries to finance their recycling and is a fixed sum that is applied to the before-tax amount on the invoice.
If you trade with a company in your own country, and your country has a DEEE-type tax, the applicable taxes for this invoice could be:
- DEEE: 5.5,
- VAT: 19.6%.
If you sell to a customer in another company of the European community (intracommunity) instead, then tax is not charged. In the partner form, in the tab Accounting, the Fiscal Position field keeps information about whether the customer is a local, an intracommunal or an export customer. When you create an invoice for this customer, OpenERP will calculate the following taxes on the product:
- DEEE: 5.5,
- Intracommunal VAT: 0%.
If you have not entered the parameters in the customer form correctly, OpenERP will suggest incorrect taxes in the invoice. That is not a real issue, because you can always modify the information directly in the Fiscal Position field of the invoice before approving it.
If you do not enter a product in the invoice line, but instead use text, you can easily add taxes manually, or they may be added automatically from the general account if it has been linked to default taxes.
Cancelling an Invoice
By default, OpenERP will not allow you to cancel an invoice once it has been approved. Since accounting entries have been created, you theoretically cannot go back and delete them. However, in some cases, it is more convenient to cancel an invoice when there is an error than to produce a credit note and reconcile the two entries. Your attitude to this will be influenced by current legislation in your accounting jurisdiction.
OpenERP accommodates either approach. The account_cancel module can be installed if in your country it is allowed to cancel an existing invoice, correct it and revalidate it. You have to set up some parameters for this module to work. You need to allow cancellation of entries by checking the Allow Cancelling Entries box in the Journal corresponding to an invoice. You will then be allowed to cancel the invoice if the following two conditions are met:
- The accounting entries have not been reconciled or paid: if they have, then you will have to cancel the reconciliation first.
- The accounting period or the fiscal year has not been closed yet: if it is closed, no modification is possible.
When you cancel an invoice, the corresponding accounting entries will automatically be modified accordingly.
You can cancel an invoice by clicking the Cancel button in the invoice form. You could then move it from Cancelled to the Draft state to modify it. Once you have made the required changes, you have to regenerate the invoice by clicking the Validate button. Note that the original invoice number will still be used for this invoice.
Tip
Numbering Invoices
Some countries require you to have contiguously numbered invoices (that is, with no break in the sequence). If, after cancelling an invoice that you are not regenerating, you find yourself with a break in the numbering, you should modify the sequence, redo the invoice and replace the sequence number with its original value.
You can control the sequences using the menu Settings ‣ Configuration ‣ Sequences & Identifiers ‣ Sequences.
Cancelling an invoice without regenerating it, will cause a break in the number sequence of your invoices. You are strongly advised to recreate this invoice and reapprove it to fill the hole in the numbering.
Controlling a Supplier Invoice
The form that manages supplier invoices is very similar to the one for customer invoices. However, it has been adapted to simplify rapid data entry and monitoring of the amounts recorded.
Tip
Entering Data
Many companies do not enter data through supplier invoices, but simply enter accounting data corresponding to the purchase journal.
This particularly applies to users that have focused on the accounting system rather than all the capabilities provided by an ERP system. The two approaches reach the same accounting result: some prefer one and others prefer the other depending on their skills and needs.
However, when you use the Purchase Management functions in OpenERP you should work directly on invoices because they are created from Purchase Orders or Goods Receipt documents.
To enter a new supplier invoice, use the menu Accounting ‣ Suppliers ‣ Supplier Invoices.
Everything is similar to the customer invoice, starting with the Journal unless the default journal is acceptable, and then the Supplier, which will automatically complete the following fields:
- Invoice Address,
- Partner Account.
Unlike the customer invoice, you do not have to enter payment conditions (although you can, of course) – simply a Due Date will do. If you do not give a due date, OpenERP assumes that this invoice will be paid in cash. If you want to enter more complete payment conditions than just the due date, you can use the Payment Term field which you can find on the second tab Other Info.
You can also store the supplier’s invoice number in the Free Reference field. You also have to enter the invoice’s Verification Total amount, taxes included. OpenERP uses this amount to check whether all invoice lines have been entered correctly before it will let you validate the invoice.
Indicate the Currency if the invoice is not going to use the default currency, then you can enter the Invoice lines.
Just like the customer invoice, you have the choice of entering all the information manually or use a product to complete many of the fields automatically. When you enter a product, all of the following values are completed automatically:
- the product Account is completed from the properties of the product form or the Category of the product if nothing is defined on the product itself,
- the Taxes come from the product form and/or the general account, based on the same principles as the customer invoice,
- the Quantity is set at 1 by default but can be changed manually,
- set the Unit Price according to the total price on the invoice after deducting all the different applicable taxes (so the amount exclusive of taxes),
Click Compute Taxes to ensure that the totals correspond to those indicated on the paper invoice from the supplier. When you approve the invoice, OpenERP verifies that the total amount indicated in the header corresponds to the sum of the amounts exclusive of tax in the invoice lines plus the different applicable taxes.
Note
Invoice Date
OpenERP automatically completes the Date Invoiced and the accounting period on validation, so make sure to enter the invoice date indicated on your supplier invoice before validating.
Note
Dates and Accounting Periods
Accounting periods are treated as legal periods. For example, a tax declaration for an invoice depends on the accounting period and not on the date of invoicing.
Depending on whether you have monthly or quarterly declarations, the fiscal year generally contains either twelve or four accounting periods. We do not take into account any opening / closing periods here.
The dates are shown in the document you created in the accounting system. They are used to calculate due dates.
You may find that the amounts do not correspond with what your supplier has given you on paper for reasons that may include:
- the supplier made a calculation error,
- the amounts have been rounded differently.
Tip
Rounding Tax
It often happens that a supplier adds 1 to the total because the tax calculation has been rounded upwards. Some tax amounts are not valid because of this rounding.
For example, it is impossible to arrive at the amount of 145.50 if you are working with a precision of 2 decimal places and a rate of 19.6%:
- 121.65 x 1.196 = 145.49
- 121.66 x 1.196 = 145.51
In this case, you can modify a value in the lines the total is based on, or the total amount of taxes at the bottom left of the form (in the tax box): both are editable so that you can modify them to adjust the total.
When the totals tally, you can validate the invoice. OpenERP then generates the corresponding accounting entries. You can manage those entries using the Account fields on the invoice and on each of the invoice lines.
In a logistic configuration, invoice control for purchase invoices can be done either according to the purchase order, or the picking. When invoicing is from the purchase order, a draft invoice will be created on confirmation of the purchase order. This allows the accountant to easily check the purchase order against the invoice received from the supplier without actually looking at the purchase order. When invoicing is done from the picking, an invoice will be created as soon as the picking is confirmed. This allows the accountant to easily check the picking list against the invoice received from the supplier without actually looking at the picking list.
Credit Notes / Refunds
Entering a customer credit note is almost identical to entering a customer invoice. You just start from the menu Accounting ‣ Customers ‣ Customer Refunds.
Similarly, entering a supplier credit note is the same as that of the supplier invoice, and so you use the menu Accounting ‣ Suppliers ‣ Supplier Refunds.
Of course with OpenERP you can quickly generate a credit note from an existing invoice. To do this, select the customer or supplier invoice that has to be refunded, with Open or Paid status. Click the Refund button. OpenERP allows you to select several methods for creating credit notes directly from the related invoice (both for customers and suppliers).
Below you find the different options displayed when you click the Refund button on an invoice.
- Create a Draft Refund
- Creates a draft credit note of the complete invoice. You can change this credit note, i.e. to make a partial credit note.
- Modify
- Creates a credit note for the existing invoice, validates the credit note and reconciles it with the invoice. The existing invoice is duplicated so that you can modify it.
- Cancel
- Creates a credit note for the complete invoice, validates the credit note and reconciles it with the invoice concerned. The existing invoice is “cancelled” in a legal way.
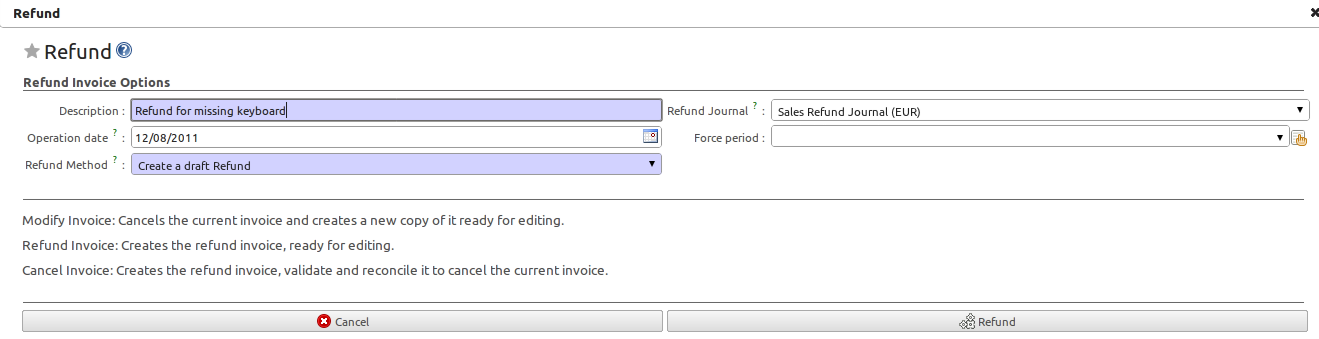
Refund from an Invoice
Advanced Setup: Payment Terms and Fiscal Positions
Payment Terms
You can define whatever payment terms you need in OpenERP. Payment terms determine the due dates for paying an invoice.
To define new payment terms, go to the menu Accounting ‣ Configuration ‣ Miscellaneous ‣ Payment Terms and click Create.
The figure below represents the following payment term: 5000 within 5 days, 50% payment at the last day of current month, remaining balance the 15th of next month.

Configuring Payment Terms
To configure new conditions, start by giving the condition a name in the Payment Term field. Text you put in the field Description on invoices, will be printed on the invoice, so enter a clear description of the payment terms there.
Then create individual lines to allow the system to automatically calculate the due dates in the section Computation. You should give each line a name (Line Name). The name is for information only and does not affect the actual computation of payment terms. The Sequence field lets you define the order in which the rules are evaluated.
Tip
Drag & Drop
You can leave the sequence number to the default value and easily drag and drop payment term lines to change the computation order. Sequence numbers will then be updated automatically.
The Valuation field enables you to calculate the amount to pay for each line according to three options:
- Percent: the line corresponds to a percentage of the total amount, the factor being specified in Amount To Pay. The number indicated in Amount To Pay has to take a value between 0 and 1 (1 equals 100%, 0,50 means 50%).
- Fixed Amount: this is a fixed value determined by the Amount To Pay box.
- Balance: refers to the balance remaining after accounting for the other lines.
Make sure to set the last line of the computation to Balance to avoid rounding errors. The highest sequence number will be the last to be evaluated.
The last two fields, Number of Days and Day of the Month, enable the calculation of the delay in payment for each line. The delay Day of the Month can be set to -1 , 0 , 1 or any other positive or negative number.
Example starting from 20th December 2011, with the following payment term:
- 5000 within 5 days: set Valuation to Fixed Amount, Amount To Pay to 5000, Number of Days 5 and Day of the Month 0. That creates a journal entry with a due date of 25th December 2011.
- 50% last day of current month: set Valuation to Percent, Amount To Pay to 0.50`, Number of Days 0 and Day of the Month -1. That creates a journal entry with a due date of 31st December 2011.
- Remaining 15th of next month: set Valuation to Balance, Number of Days 0 and Day of the Month 15. That creates a journal entry with a due date of 15th January 2012.
What do the digits in the Day of Month field represent?
- -1 = last day of the current month
- 0 = net days
- 1 = first day of the next month
- -2 = last but one day of the current month
- 2 = second day of the next month
- 30 = 30th of the next month
- -30 = 30th of the current month
You can add default payment terms to a customer or supplier through the Accounting tab in the Partner form. On an invoice level, you can change the default payment terms.
Fiscal Positions
The basic configuration of products, for instance, will only take into account local taxes. But of course, you would like OpenERP to determine the corresponding taxes for you when you are invoicing to a customer within the European Community, to give an example.
Now that is what fiscal positions can be used for. Through fiscal positions, you can instruct OpenERP to use the correct taxes. Fiscal positions allow you to make a mapping from e.g. national taxes to intracommunal or external taxes. Moreover, these mappings also allow you to change income / expense accounts automatically when posting entries. An example of this: suppose you have an income account for local sales, one for intracommunal sales and one for export. By defining fiscal positions, you can have the system change the income account automatically.
You can link fiscal positions to your customers and suppliers to ensure automatic and easy VAT and/or account conversion.
To create a new fiscal position, go to Accounting ‣ Configuration ‣ Financial Accounting ‣ Taxes ‣ Fiscal Positions and click Create.
Create for instance a fiscal position for Intracommunal Taxes.
Type Intracommunal Taxes in the Fiscal Position field. In the Tax Source field, select the local tax that has to be converted for use with intracommunal partners. Then link the intracommunal tax to be used in the Replacement Tax field. Do this for each local tax that has to be converted for intracommunal use. If you also want accounts to be changed, you can add Account Source (the local account) and Account Destination (intracommunal account).
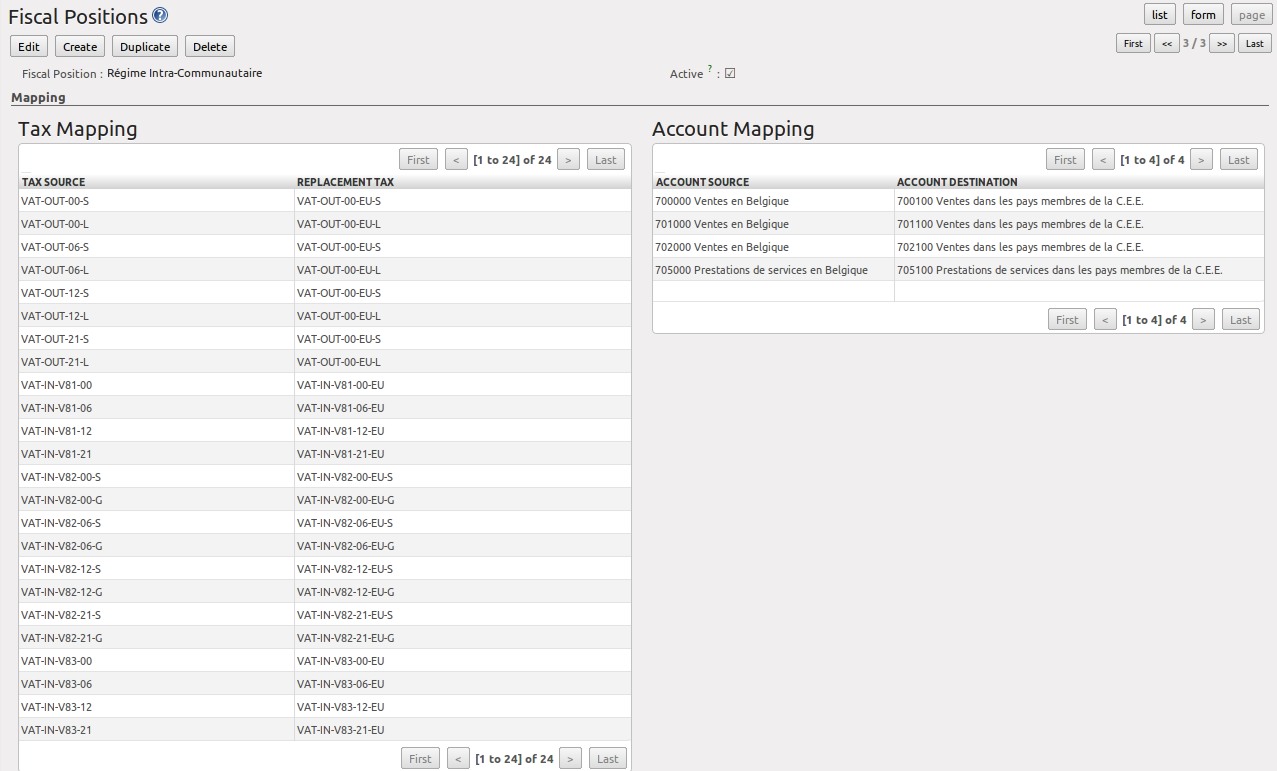
Fiscal Position