Opening and Closing a Financial Year
At the end of a financial year, you will have to transfer the closing balance of that year as an opening balance to the new financial year. OpenERP allows you to automatically post such an entry. You can transfer the new opening balance numerous times, because it is impossible to close a year at once. Correction entries will have to be made, due to which balances will change. The new balance can easily be transferred through a wizard, so you do not have to keep track of each correction entry made in the previous financial year.
Note
OpenERP Accounting
The procedure below is valid if you already have a financial year with entries in OpenERP.
Steps to Open a New Financial Year in an Existing OpenERP Configuration
Before generating the opening balance for your various accounts, you have to go through several steps.
- Create the new Financial Year
Create the new financial year as explained in Defining a Period or a Financial Year.
- Define an Opening Period
Go to Accounting ‣ Configuration ‣ Financial Accounting ‣ Periods ‣ Periods and create a new period for the financial year you wish to open (in case it has not been generated automatically). Make sure to link the period to the newly defined financial year. Select the Opening/Closing Period checkbox to indicate that this period should be used for opening entries. Both dates typically match the first day of your financial year (e.g. 01/01/YYYY).
- Check the Account Types
Before generating the opening entries, make sure to check the defined account types, more specifically the Deferral Method. The deferral method determines whether and how account entries will be transferred to the new financial year. There are four possible deferral methods: None, Balance, Detail, Unreconciled.
| Deferral Method | Action |
|---|---|
| None | Nothing will be transferred (typically P&L accounts) |
| Balance | Account balance will be transferred (typically Balance Sheet accounts) |
| Detail | All entries are transferred, also reconciled entries |
| Unreconciled | Only entries that are not reconciled on the first day of the new financial year will be transferred (typically receivable and payable) |
- Check the Link between Account and Account Type.
Check whether each account is linked to the correct account type to avoid generating an incorrect opening entry.
- Create an Opening/Closing Journal
Go to Accounting ‣ Configuration ‣ Financial Accounting ‣ Journals ‣ Journals. Create a new journal to post your opening entries. Make sure to respect the following settings:
- Type should be Opening/Closing Situation.
- Standard debit/credit account could be something like 140000 Benefits.
- Centralised counterpart will be checked automatically when select the journal type, to avoid a counterpart on each line, and instead have one debit and one credit entry on the corresponding opening account.
- The Entry Sequence will also be created automatically on save.
Generating the Opening Entry
To automatically generate the opening entries based on your actual books, OpenERP provides a wizard. Go to Accounting ‣ Periodical Processing ‣ End of Period ‣ Generate Opening Entries.
In the wizard, enter the financial year for which you want to transfer the balances (Fiscal Year to close). Select the New Fiscal Year (the year in which you want to generate the opening entry). You also have to select the journal and the period to post the opening entries. The description for the opening entry is proposed by default, but of course you can enter your own description, such as Opening Entry for financial year YYYY. Then you click the Create button to generate the opening entry according to the settings defined.
To have a look at the draft opening entry that has been generated, go to Accounting ‣ Journal Entries ‣ Journal Entries. Click the Unposted button to filter only draft entries. Open the corresponding entry and verify the data. Click the Post button to confirm the entry.
Note
Changes in Previous Financial Year
As long as the audit is ongoing, extra entries may be added to the financial year to close. To automatically have the correct balances, OpenERP allows you to use the Cancel Opening Entries wizard. This wizard will automatically cancel the existing opening entry.
To update the balances to show the correct results, you should run the Generate Opening Entries:guilabel: wizard again. The new opening entry will contain the correct balances. This way, you can generate your opening entry as many times as required.
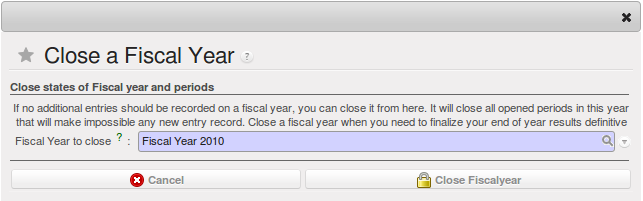
Closing a Financial Year
To close a financial year, use the menu Accounting‣ Periodical Processing ‣ End of Period ‣ Close a Fiscal Year. A wizard opens asking you for the financial year to close.
When the year is closed, you can no longer create or modify any transactions in that year. So you should always make a backup of the database before closing the fiscal year. Closing a year is not mandatory, and you could easily do that sometime in the following year, when your accounts are finally sent to the statutory authorities, and no further modifications are permitted.
Closing a Financial Year
Steps to Start your Financial Year
When you decide to do your accounting in OpenERP, and you already have an accounting system, you should enter your opening balance and outstanding entries in OpenERP. Make sure you configure your accounting system as explained in the Configuration chapter. Below we explain the minimal configuration required to post your opening balance and outstanding entries.
- Create the new Financial Year
Create the new financial year as explained in Defining a Period or a Financial Year.
- Define an Opening Period
Go to Accounting ‣ Configuration ‣ Financial Accounting ‣ Periods ‣ Periods and create a new period for the financial year you wish to open (in case it has not been generated automatically). Make sure to link the period to the newly defined financial year. Select the Opening/Closing Period checkbox to indicate that this period should be used for opening entries. Both dates typically match the first day of your financial year (e.g. 01/01/YYYY).
- Check the Account Types
Before generating the opening entries, make sure to check the defined account types, more specifically the Deferral Method. The deferral method determines whether and how account entries will be transferred to the new financial year. There are four possible deferral methods: None, Balance, Detail, Unreconciled.
| Deferral Method | Action |
|---|---|
| None | Nothing will be transferred (typically P&L accounts) |
| Balance | Account balance will be transferred (typically Balance Sheet accounts) |
| Detail | All entries are transferred, also reconciled entries |
| Unreconciled | Only entries that are not reconciled on the first day of the new financial year will be transferred (typically receivable and payable) |
- Define Accounts
Check whether each account with an opening balance has been defined in the Chart of Accounts and is linked to the correct account type. We recommend you to define one or more suspense accounts to post your outstanding entries from the previous financial year. Check the Reconcile for such suspense accounts, because their balance will be zero.
- Create an Opening/Closing Journal
Go to Accounting ‣ Configuration ‣ Financial Accounting ‣ Journals ‣ Journals. Create a new journal to post your opening entries. Make sure to respect the following settings:
- Type should be Opening/Closing Situation.
- Standard debit/credit account could be something like 140000 Benefits.
- Centralised counterpart will be checked automatically when select the journal type, to avoid a counterpart on each line, and instead have one debit and one credit entry on the corresponding opening account.
- The Entry Sequence will also be created automatically on save.
- Create a Purchase and/or Sales Journal for Outstanding Entries
We recommend you to create separate purchase and sales journals to post the outstanding entries from your previous accounting system. This will allow you to easily keep track of your opening entries.
Go to Accounting ‣ Configuration ‣ Financial Accounting ‣ Journals ‣ Journals. Create a new purchase and sales journal to post your outstanding entries. Make sure to respect the following settings:
- Type should be Purchase or Sales.
- The Entry Sequence will also be created automatically on save.
Now you can start entering your outstanding customer and supplier entries according to your list of open entries at the end of the year.
Go to the menu Accounting ‣ Customers ‣ Customer Invoices to post your outstanding sales entries. To post your outstanding purchase entries, go to Go to the menu Accounting ‣ Suppliers ‣ Supplier Invoices.
We recommend you to use suspense accounts instead of expense or income accounts. Indeed, your expense and income accounts have already been posted in the previous financial year, and there is no need to transfer these balances. The outstanding entries from previous financial years should not contain any VAT entries; they only get the balance the customer still has to pay you, or the balance you have to pay to the supplier.
- Enter the Opening Balance (Miscellaneous Entry)
For each account that needs to be reopened, enter account data (debit or credit) in the journal. For this operation, go to the menu Accounting ‣ Journal Entries ‣ Journal Entries and select a miscellaneous journal.
Tip
Import
You can also use OpenERP’s generic import tool if you load the balance of each of your accounts from other accounting software.